
Office chair cylinder replacement typically takes 15-30 minutes and requires removing the old cylinder from both the chair base and seat mechanism.
You’ll need basic tools like a hammer, pipe wrench, and penetrating oil to complete this DIY office chair cylinder replacement safely.
Why Your Office Chair Cylinder Fails
Your office chair cylinder is basically a shock absorber that lets you adjust height. Over time, the seals inside wear out. You’ll notice your chair slowly sinking during the day or refusing to stay at the right height.
Most cylinders fail after 3-5 years of regular use. Heavy usage or poor quality can shorten this lifespan. The good news? You don’t need to buy a whole new chair.
Common Signs Your Cylinder Needs Replacement
Here are the telltale signs your cylinder is done:
- Chair sinks slowly when you sit down
- Won’t hold any height setting
- Makes hissing sounds when adjusting
- Visible oil leaks around the cylinder
- Height lever feels loose or unresponsive
Tools and Materials You’ll Need
Getting the right tools makes this job much easier. I found that having everything ready beforehand saves time and frustration.
Essential Tools
- Hammer or rubber mallet
- Pipe wrench or large adjustable wrench
- Penetrating oil (WD-40 works)
- Safety glasses
- Work gloves
- Vice grips (optional but helpful)
Replacement Cylinder
Most office chairs use standard cylinders, but sizes vary. Measure your current cylinder’s diameter and stroke length. Common sizes are 2-inch and 2.25-inch diameter tubes.
You can find replacement cylinders online or at office furniture stores for $25-60. Generic versions work just as well as brand-name ones.
Safety Precautions Before Starting
Chair cylinders contain pressurized gas. While explosions are rare, taking precautions protects you from injury.
Never Do These Things
- Don’t drill, cut, or puncture the cylinder
- Don’t apply heat or flames
- Don’t disassemble the cylinder mechanism
- Don’t force stuck parts without penetrating oil
Always wear safety glasses. Metal pieces can fly off when hammering. Work in a well-ventilated area if using penetrating oil.
Step-by-Step Removal Process
Removing the old cylinder is usually the hardest part. These steps work for most office chairs.
Step 1: Flip the Chair Over
Turn your chair upside down on a stable surface. You’ll see the cylinder extending down from the seat mechanism into the base.
Some chairs have plastic covers around the connection points. Remove these first if present.
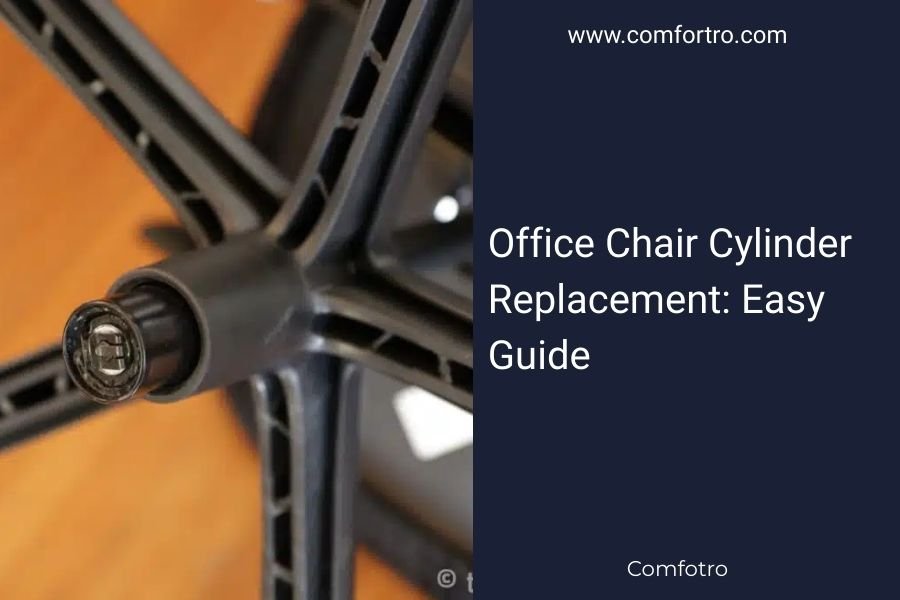
Step 2: Remove the Cylinder from the Base
The cylinder sits inside a hole in the chair base. It’s held by friction, not bolts or screws.
Grab the base firmly. Use a hammer to tap the cylinder out from above. Hit the top of the cylinder where it connects to the seat mechanism. This pushes the cylinder down and out of the base.
If it’s stuck, spray penetrating oil around the connection. Wait 10 minutes, then try again.
Alternative Method for Stubborn Bases
Some cylinders really don’t want to budge. Try this approach:
- Place a block of wood against the cylinder top
- Hit the wood block instead of the cylinder directly
- This distributes force more evenly
Step 3: Separate the Cylinder from the Seat
Now you need to remove the cylinder from the seat mechanism above. This connection is also friction-based but can be tighter.
Hold the cylinder steady. Use your pipe wrench to grip the cylinder tube near the top. Twist and pull downward while supporting the seat mechanism.
If twisting doesn’t work, try the hammer method. Place the cylinder in a vice or have someone hold it. Tap the seat mechanism upward to separate it from the cylinder.
When Parts Are Really Stuck
Old chairs sometimes have cylinders that seem welded in place. Here’s what I found works:
- Soak the connection with penetrating oil overnight
- Try alternating between pushing and pulling
- Use vice grips for better leverage
- Heat the metal slightly with a hair dryer (never use open flame)
Installing Your New Cylinder
Installation reverses the removal process, but it’s much easier with a new cylinder.
Step 4: Attach Cylinder to Seat Mechanism
The new cylinder should slide into the seat mechanism easily. Push firmly until you feel it seat completely.
Test the connection by trying to pull the cylinder back out. It should be snug but not loose.
Step 5: Insert Cylinder into Base
Lower the cylinder into the hole in your chair base. It should slide in smoothly.
Make sure the cylinder is fully seated in the base. You shouldn’t see any gap between the cylinder and the base opening.
Step 6: Test the Installation
Flip your chair back over. Test the height adjustment lever. The chair should move up and down smoothly.
Sit in the chair and check that it holds your weight at different height settings. If it sinks or feels unstable, recheck your connections.
Troubleshooting Common Issues
Sometimes the replacement doesn’t go perfectly. Here are fixes for common problems.
Cylinder Won’t Fit
If your new cylinder doesn’t fit, you likely have a size mismatch. Double-check the diameter measurements. Some older chairs use non-standard sizes.
Chair Feels Wobbly
Wobbling usually means the cylinder isn’t fully seated in either the base or seat mechanism. Remove and reinstall, making sure both connections are tight.
Height Adjustment Doesn’t Work
New cylinders sometimes need a few cycles to work properly. Try adjusting up and down several times. If it still doesn’t work, the lever mechanism in your seat might be broken.
Maintenance Tips for Your New Cylinder
A little care extends your cylinder’s life significantly.
Regular Cleaning
Wipe down the cylinder shaft monthly. Dust and debris can damage the seals over time.
Proper Usage
Don’t exceed your chair’s weight limit. Avoid dropping into the seat from standing height. These habits stress the cylinder unnecessarily.
Lubrication
Most modern cylinders are maintenance-free. Don’t add oil or grease unless the manufacturer recommends it.
| Cylinder Type | Expected Lifespan | Best For |
|---|---|---|
| Standard Gas | 3-5 years | Light to moderate use |
| Heavy Duty | 5-8 years | Heavy users or constant use |
| Premium | 8-10 years | Office environments |
When to Call a Professional
Most people can handle cylinder replacement themselves. But sometimes professional help makes sense.
Consider calling a repair service if:
- Your chair is under warranty
- You’re not comfortable using tools
- The cylinder is completely seized
- Other chair parts seem damaged
Professional replacement typically costs $50-100 including parts.
Cost Comparison: Repair vs Replace
Chair cylinder replacement costs $25-60 for parts plus your time. Compare this to buying a new chair.
If your chair originally cost under $150, replacement might make more sense. For higher-end chairs, cylinder replacement is almost always worth it.
Conclusion
Office chair cylinder replacement is a straightforward DIY project that can save you hundreds of dollars. With basic tools and about 30 minutes, you can restore your chair to like-new condition.
The key is taking your time with removal and having the right replacement cylinder. Don’t rush the stuck connections – penetrating oil and patience work better than brute force.
Your back will thank you for fixing that sinking chair instead of struggling with it for months. Plus, you’ll have learned a useful skill for future office chair issues.
How long do office chair cylinders typically last?
Most office chair cylinders last 3-5 years with regular use. Heavy-duty cylinders can last 5-8 years, while premium models may last up to 10 years. Factors like user weight, usage frequency, and cylinder quality affect lifespan.
Can I use any cylinder as a replacement for my office chair?
No, you need to match the cylinder diameter and stroke length to your chair. Most chairs use standard 2-inch or 2.25-inch diameter cylinders, but some older or specialty chairs require specific sizes. Measure your current cylinder before ordering.
Is it dangerous to remove a pressurized chair cylinder?
Chair cylinder removal is generally safe when done properly. The main risks come from using inappropriate tools or trying to disassemble the cylinder itself. Never drill, cut, or apply heat to the cylinder, and always wear safety glasses during removal.
Why does my chair keep sinking even after cylinder replacement?
If your chair still sinks after installing a new cylinder, the height adjustment lever mechanism in the seat may be broken. This internal mechanism controls gas flow in the cylinder. You’ll need to replace the entire seat mechanism or the lever assembly.
How much money can I save by replacing the cylinder myself?
DIY cylinder replacement typically costs $25-60 for parts. Professional repair runs $50-100, while new office chairs cost $100-500 or more. You can save $75-400 depending on your chair’s value and local repair costs.